Portfolio

Monday 6 October 2014

Adding colour filters in less than a minute

Applying filters as easy as Instagram? Introducing, Alien Skin Exposure. Ever since I discovered Alien Skin, most of my photos have been edited through this programme just because it is so easy and the variety of filters makes editing so enjoyable.

I am currently using Alien Skin Exposure 4, but Exposure 6 is out! Click here to download the free trial: https://app.alienskin.com/downloads/

So how does Alien Skin work?
This is an image that I shot on my GoPro. The puppy is really cute, but due to poor lighting, the image looks flat and slightly blur.
1. When you download and install Alien Skin, it appears as a plug-in under your 'Filter' list in Photoshop.
2. Opening the application, you can see that it offers an array of filters (on the left), as well as specific control (on the right). Alien Skin gives you hundreds of colour filters.
3. As well as Black & White filters.
4. After selecting a filter, you can still make further adjustments. I wanted to add more vignetting to increase the focus on the puppy. You can do so under the 'Age' tab.
5. Also, to make the image sharper, you can do so under the 'Focus' tab.
6. And there you have it! Adding a colour filter in less than a minute. 

Alien Skin provides you with hundreds of filters. Download the free trial and find which filters are your favourite! Another big benefit of using Alien Skin is that it allows you to play with film effects. Therefore, if you are interested to go into film photography and are wondering which camera to purchase, Alien Skin gives you a visual representation on your current photos! Happy editing!

Thursday 2 October 2014

Photoshop Versus Lightroom - Which is Right for You?

"One of the most important roles you play as a photo enthusiast is that of an image editor. Rarely do our images come straight out of the camera exactly as we had envisioned, so before release we are required to put out shots through the post processing phase".

Many people often ask if editing photos on Photoshop or Lightroom is better. As with most of my answers to things in life - it really depends. In a recent article by Tim Gilbreath, Photoshop Versus Lightoom - Which is Right for You?, he accurately captures the pros and cons of both softwares.


Here's a quick summary of his points that I agree with.

Strengths of Photoshop:
  1. Pixel-level editing
  2. Layers
  3. Compositing and Blending
  4. Huge toolbox
Weaknesses of Photoshop:
  1. Steeper learning curve
  2. No built-in RAW editing
Strengths of Lightroom
  1. Image management and workflow centric
  2. Simple and easy to use
  3. Presets
Weakness of Lightroom
  1. No advanced editing tools
  2. No layers management
  3. Only for photos
Personally, I use Photoshop when a higher degree of editing is required for a photo. In other words, Photoshop enables more control over the image. Although it has a steep learning curve, understanding the potential of photoshop could really transform your image. On the other hand, I use Lightroom when I have a huge batch of photos to edit. Although there are less functions, I am able to retouch and process images quickly and consistently. 

What's your verdict?

Tuesday 30 September 2014

Essential tools to save your photo (PART 2)

I believe this tutorial will interest a lot of you - How to remove pimples / smudges / dirt from your face? Introducing the Patch Tool.


How do I use this tool:

1. Select the Patch Tool.

2. Draw out or circle the region that you wish to be 'patched' up.

3. Click and drag this region to another area that you wish to patch from. E.g. for removing pimples, I will click and drag to an area on the face which is clear and clean. Make sure you select the "Source" option (refer to the red arrow). For those who are curious to know what happens if you select the "Destination" option, try it out and let me know!

4. Your pimples are gone.

You are welcome.

Friday 26 September 2014

Essential tools to save your photo

Have you ever captured a beautiful moment, but the photo turned out too dark? 
Introducing, Levels. The Levels tool adjusts brightness levels through 3 components: Image shadows, Midtones and Highlights. This allows you to edit the colour balance and tonal range of an image.
Adapted from: http://helpx.adobe.com/photoshop/using/levels-adjustment.html
So how do I use the Levels tool:

1. As you can see, this image is too dark. 


2. Select the tool

3. The image histogram is shown.

4. Sliding the Midtones and Highlights brightens the image.

 5. You can see that the Levels tool provides you with a lot more control in adjusting your image tones.

6. Here is a comparison between a general increase in Brightness and an adjust using the Levels tool.

Wanna know how to remove pimples? Stay tuned to next week's tutorial!


Thursday 25 September 2014

Loving the colours on a photo and wondering how to recreate it?

Have ever been tasked to design a poster, but can't seem to find the right colours to match and mix? Here's a way to paint your photos by using natural colours. Introducing, the Eyedropper Tool.


 1.Open Colour Picker by clicking on the square boxes.

2. Selecting the Eyedropper tool, select on the colour you like. By clicking on the blue clouds, the Eyedropper tool shows me that the colour code for this particular blue is #2b374f.

3) By using the Eyedropper Tool, I am able to create a customised similar colour palate to paint my pictures.

Alternatively, if you are lazy and want quick preset colour themes, do check out Adobe Kuler at https://kuler.adobe.com/explore/most-popular/?time=month!

Tuesday 23 September 2014

Dieting is easy on Photoshop

(Disclaimer: This post serves to explain the tool; keeping fit and healthy should still be part of your lifestyle. Also, this post serves to expose what Photoshop can do and remind you that what you often see in magazines etc. are not entirely true)
1. Open your image on Photoshop. Open Filter and select Liquify.
 2. Select the 'Forward Warp Tool'. Adjust your Brush Size and Brush Pressure. For the model below, I clicked and pulled inwards to make her look more skinny.
 3. In the image below, you can see that I have 'pulled in' her stomach. However, her right arm has not been edited yet.
4. After completing your edit, click OK to apply your changes. Once again, remember to add a layer mask. (If you are not sure what a layer mask is, you can refer to my previous post here!) Ensure your brush tool is coloured black and start painting over the distorted portions.
5. Although the distortion is minimal in this example, you can see the difference a layer mask makes.

Here is a more extreme example to illustrate the importance of layer masks to remove the unwanted distortion:


You can check out some of the most ridiculous photoshopped fails ever here: http://www.buzzfeed.com/elliewoodward/the-most-wtf-celebrity-photoshop-fails-of-all-time#1hc6kjo
Number 15 on this list is really... wow.

Let me know your thoughts about this! I would be glad to hear from you (:


Saturday 20 September 2014

Gyming is easy on Photoshop

(Disclaimer: This post serves to explain the tool; keeping fit and healthy should still be part of your lifestyle. Also, this post serves to expose what Photoshop can do and remind you that what you often see in magazines etc. are not entirely true)

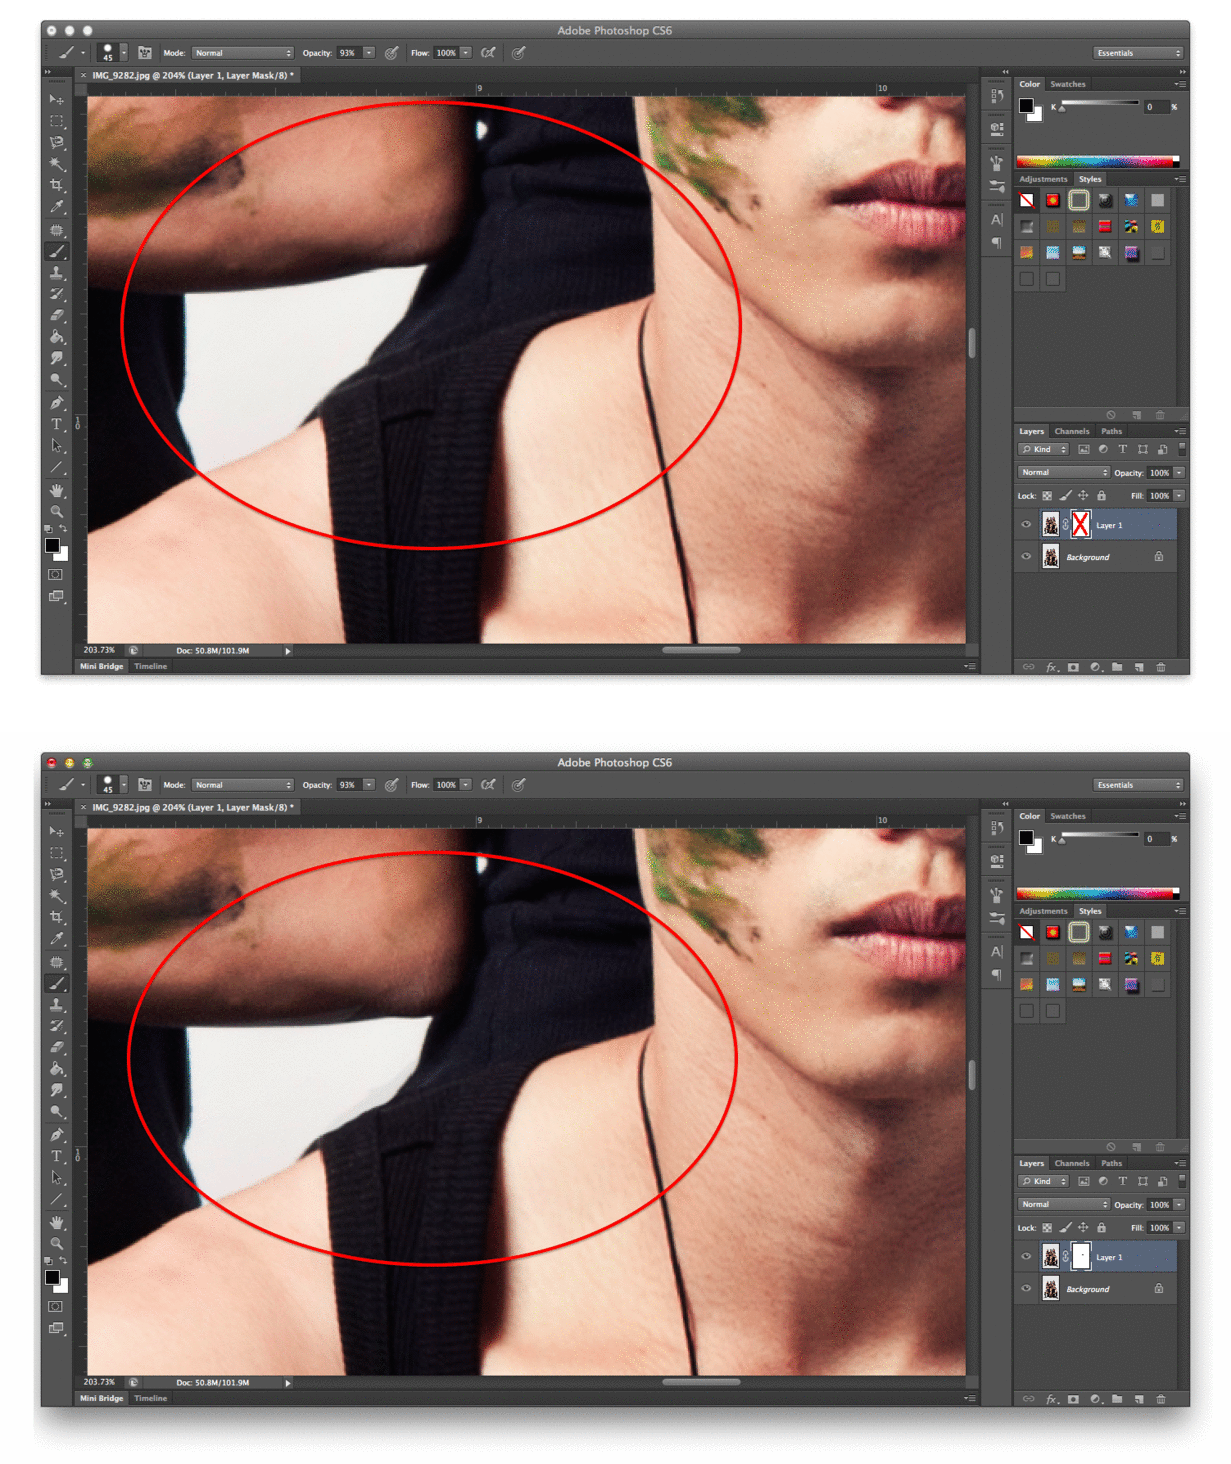
1. Under Filter, select Liquify.

2. Select the Bloat tool, and adjust your Brush Size and Brush Pressure.

3. Click and hold to 'bloat' up certain body parts. It would be good to have some knowledge of muscle groups so that you can expand your model's muscle proportionately! If you 'over-bloat' the body part, just hit Command+Z or Ctrl+Z to undo.
 4. You can see that I have 'bloated' his arms, shoulders and trapezoids. Click OK when you are done to apply!
5. (***Here comes the most important step***) If you notice in the image below, other parts of the photo have also been distorted due to liquify. Hence, create a layer mask.
 6. Ensure that your brush tool is coloured black, slowly paint over the distorted areas.
7. This is a comparison of the image with and without the layer mask. Although the distortion is minor in this example, I am sure that you have heard of Photoshop disasters where models forget to erase the distortion spillover on the background. 
This is a popular example that some of you may be familiar with. You can see that the building in the background is distorted. So remember to use your layer masks!


Stay tuned for 'Dieting is easy on Photoshop' coming out next week!


Friday 19 September 2014

Removing unwanted objects in a photo?

Have you ever taken a nice photo, but upon inspection you realised there is someone in the background, or perhaps your finger got in the way? There is a simple way to repair your photo. Introducing, the Clone Stamp Tool.


Here's how to do it:


1. Using the Clone Stamp Tool, move your mouse the area you want to 'cloned'.
 2. Alt-Click (for Window users) or Option-Click (for Mac users). You will notice that your cursor changes into a target symbol.

 3. Click and drag over the area which you want to replace. You can see that I am beginning to paint over the person who I want to be removed from the photo!

Alternatively, the Clone Stamp can be used in a different way - to reproduce images such as drawing another tree in your photo! Find out more at: http://www.mediacollege.com/adobe/photoshop/tool/clone.html

Tuesday 16 September 2014

#vscocam #vsco

Have you ever used the VSCO CAM fade effect?
If you've ever wanted to add the ever popular fade effect to your images on Photoshop, here's how to do it in 4 simple steps:

This is the initial photo, without any filters.

1. At the functions bar below, select the Solid Colour option.

 2. Change the colour code to #4e4e4e

3. Select this colour layer and under blending options, select Lighten.

4. Adjust the opacity to achieve your desired effect. My current opacity settings is at 50%.

Here is a before and after comparison:


For more advanced VSCO CAM adjustments, you can edit Levels, Vibrancy, Curves, Contrast, Brightness etc. Experiment for your desired effect!

Learn how you can take a step further at http://www.youtube.com/watch?v=tmgJZAgtXxU.